More from your blog

RESOURCES FOR BLOGGERS

  • Bloglovin
  • Facebook
  • Instagram
  • Pinterest
  • Twitter
  • YouTube
  • CHOOSE YOUR BLOGGING LEVEL
    • I DON’T HAVE A BLOG YET
    • I AM A NEW BLOGGER
    • BLOGGING IS MY BUSINESS
  • HOW TO START A WORDPRESS BLOG
  • BLOGGING TOOLS
  • OUR MAIN BLOG — KATIE DID WHAT
  • READ THE OLD BLOG

How to Lower Your Bounce Rate from 85% to 10% with One Easy Fix

17 Comments

how to lower your bounce rate


Want to know how to lower your bounce rate? First, we should talk about why you would want to lower it. Some advertisers care about bounce rate, so providing them with a more accurate number is a big deal. There is a good chance that your bounce rate is currently an inaccurate measure of how engaging your content is.

How? Well, let’s look at what Google says about bounce rate.

“Bounce rate” in Google Analytics is one of the key metrics that helps to evaluate the quality of your traffic. “Bounce” happens when the visitor exited the website right from the landing page, without going to any other page. This is a great indication on how relevant the content was for the user and how engaged they were with your website.

Ok, to me that is not right. Let’s say you have a blog and you write one lengthy post every day, every other day or even weekly. People know that when they come to your site, they’re going to get a nice, 5000 word blog post that they love to read. Just because they leave after they read that entire post doesn’t mean they are not engaged. They should definitely not be considered a bounce! That was someone who spent 10 minutes or more on your blog, consuming your content. I’d say the content was pretty relevant!

So now that we an agree that a “bounce” is not necessarily someone who only visits on page, how do we fix what Google thinks about “bounce rate”? I mean, “this is a great indication on how relative the content was” is total crap! They are saying that if someone spends 10-15 minutes or more reading my blog post and then they leave, Google thinks the content was not relevant! So obviously, this needs to be fixed.

Well, the funny thing is that this is not really new news. As a matter of fact, Google put an article on its own blog 2 years ago about this.

Ok, so what exactly do you do?

You’ll be adding this snippet of code into your Analytics code:
setTimeout(“_gaq.push([‘_trackEvent’, ’15_seconds’, ‘read’])”,15000);
The 15000 means 15 seconds. Customize that to whatever you think is correct. I kept mine at 15 seconds. This code creates an “event” after 15 seconds. Once the “event” is created, the user is not counted as a “bounce” no matter what they do after that point.

Where do you put it? Well, below is a picture of what your code will look like. Place it where you see the red box.
lower your bounce rateUsing the new Universal Analytics? No problem! Use the example below:
codeThat will do it! Now, when someone stays on your site for at least 15 seconds (or whatever time amount you choose), they will be registered as a “non-bounce” user.

I should also mention the caution that Google says we should take when using this function:

We hope this small fix will allow you to track and understand the users’ behavior and quality of the traffic coming to your website more accurately, and make more informed decisions. One thing website owners should be vary of, though, that not only the function may slow down the users’ experience, even insignificantly, but will also increase the volume of hits your site sends to Google Analytics, which might bring your usage over the limit (currently set at 10 mln hits per month). As such, this fix should only be applied when necessary and justified by the concept of the website and the landing pages.

I have not run into a problem and I have not heard of anyone who has, but I feel better having told you about the warning. 🙂

Note: Please use this featured responsibly. If you have an advertiser that you really want to work with, it is not in good ethical practice to lower your “event” to one second to drop your bounce rate.

Filed Under: Blog, General Blogging Tips, Get Noticed, Tutorials Tagged With: googla analytics, tutorial

How to Block Specific Ads or Categories in AdSense

4 Comments

How to block unwanted adsense ads from showing on your blog


If you’re like me, you like to have a little control over the ads that appear on your site. Well, if you give AdSense free reign, you might see an ad on your site one day that you really would rather not appear on your site.

Did you know you can block individual ads, ad networks or ad categories?

Here’s how:

To Block Individual Ads That Showed on Your Site

Head over to your AdSense account and click the “Allow & block ads” tab at the top.
how to block specific ads in adsense

Now, here you might have to apply or enroll for the Ad Review Center. You can do that on the page you’re on. Once you’re in and you click the “ad review” tab, you’ll see something like the screen below:
ad review center
From this screen, you can see every ad that has been displayed on your site(s). Hover your mouse over a specific ad to see some options. You can click anywhere on the ad to block that single ad. Use the dropdown menu while hovering to block the entire AdWords account for that ad. I would say, the majority of the time, if an ad is bad enough to block, you’ll probably want to block the entire account.
blocked ad
Once you’re done blocking the ad or ads that you want, you’re all set.

Now, if you’re really particular as to what type of ads show on your site, you might consider blocking entire categories instead. See how to do that below.

How to Block Entire Ad Categories from Showing on Your Site
We’re going to be in the “allow & block ads” section again.

First of all, you’ll see an “ad serving” tab as a top menu option. I ignore that because I feel that blocking ads with those settings is much too general. You’ll wind up taking away too many ad options and lowering your revenue.

You may want to use the “ad networks” tab if you hear about a network that is producing bad ads or something. Chances are, you’ll only find out through the Ad Review Center and will block ads in there though.

Ok, now here’s where you might want to spend some time. Below is the “sensitive categories” area:
block ads
Above is mine. As you can see, you can easily block ads from categories such as: dating, sex, politics, weight loss and more.

What is really nice about this screen, is you are shown some vital performance stats of the categories. Right on this screen, you can see which % of total ad impressions the individual categories provided. Additionally, you can also see which % of earnings those categories provided.

So if you’re on the fence about blocking a category and you see that it’s not performing, then just block it!

Next to the “sensitive categories” tab is one for general categories. There, you can block a variety of other categories. Here, I don’t have any blocked.

Farthest to the left is a tab named “advertiser URLs”. Here, you can manually enter URLs of sites that you don’t want to advertise for.
how to block individual ads
This is important to know if you find out that a competitor has started advertising through AdSense. How terrible would it be to be advertising for your direct competition?!

A few notes:
– Don’t go too crazy blocking categories. The more possible ads AdSense has to choose from to show on your site, the higher your CPC will be.
– Remember that ads show based on your browsing history, so ads you see, others may not.

– Never click your own ads.

So there you go! Now you can block those nasty toe fungus ads from your lovely blog!

Filed Under: Blog, Make Money Blogging, Tutorials Tagged With: google adsense, tutorial

Beginner’s Google Analytics Tip — How to See Your Most Popular Posts

2 Comments

How to See Your Most popular Posts
Google Analytics is a very powerful, yet complicated tool. It can be quite overwhelming just logging in and looking at the front page of Analytics. This post will show you how to do something pretty basic – see your top posts in terms of traffic.

First up, you’ll want to select the date range for your research. Do you want results from this past week? This current month? All year? Look in the upper-right portion of your screen when in Analytics for this:
google analytics date rangeClick the arrow and use the calendar to select the date range that you want.

Now, to see the top posts, look over at the long menu going down the left side of the page.
google analytics tip behaviorClick “behavior” and a new long menu will drop down.

It will look like this:
all pages
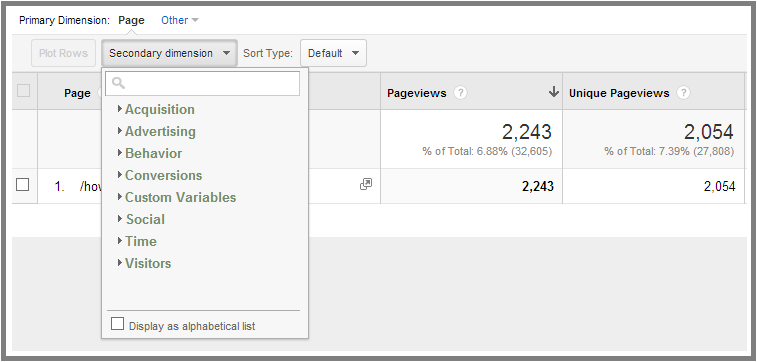
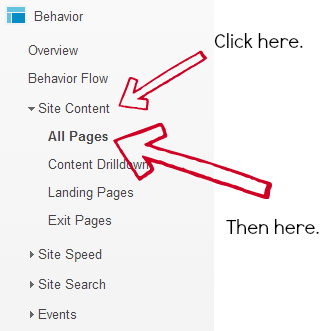
You’ll want to click “site content” then “all pages” to bring up your top pages.

You will now see a list of posts and pages from your blog on the main part of the screen.

Let me explain what you’re looking at here:
view
By default, you will be seeing the top pages according to pageviews (the first column with numbers). Where you see the arrows in the pic above, you can click to sort the pages by those options. Included are unique pageviews, average time on page, bounce rate and more.

If you’re looking for the most popular page, you’ll want to go by the pageviews column.

You might encounter some pages that look odd to you like:
pages
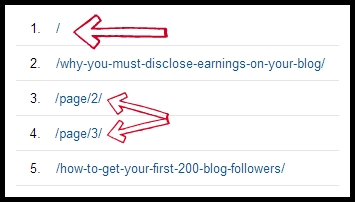
The lone slash is your homepage. The /page2, /page3 and beyond are when people scroll down to the end of you homepage and click “older posts” or “next”. The content on /page2 etc is always changing, so it’s not the best representation of who is seeing what. It just tells you that people are browsing through your blog, which isn’t a bad thing!

You are not limited to the top 10 posts here either. There are little arrows at the bottom right where you can scroll through all the way to your least popular post.

Knowing which posts are the most popular can be beneficial for many reasons. Perhaps you didn’t even know that a post from 2 years ago was still getting a lot of traffic. Maybe it might be good to add an email subscription box to the post, or an AdSense ad. Another good reason to know which posts are popular is so that you have a good grasp on what is working when it comes to your site. You want to write about what people want to read, so pay attention to your top posts!

Are you surprised to see certain posts on your top 10?

Filed Under: Blog, Tutorials Tagged With: google analytics, tutorial

WordPress Users with cPanel — How to Block a Single IP Address from Accessing Your Site

5 Comments

how to block an ip address from accessing your site with wordpress and cpanel
The other day, my wife Katie got over 800 SPAM email comments within the span of 6 hours. I noticed that they all came from the exact same IP address. I blocked that IP address and then realized that I should show you all how I did it.

First things first, this tutorial is for WordPress users who have cPanel.

Second, why would you want to block them?
Well, every time someone visits your site, it uses a little bit of memory from your webhost. If this happens 800 extra times in a span of a few hours, that can add up to a significant amount of memory (depending on your hosting plan) and could even lead to your site slowing down or shutting down. Not to mention the annoying 800 spam comments that they leave behind.
Note: You can also use this method to stop trolls from accessing your site. If you have someone harassing you leaving rude comments, just block them!

Ok, so how do you block them?

First, let me show you how to find their IP address.

Get to the comments section in your WordPress dashboard and look for this:
how to block an ip address

(This is NOT my IP address at all, I have edited it for this post.)
You can easily tell if the comments are all coming from the same person if the IP address is the same.

You can also, in cPanel, go to “latest visitors” under the Logs section and see every IP that is accessing your site (comment left or not).

Ok, now that you have the IP, what’s next?

Go to your cPanel and it will look like this:
ip deny manager
Ok now don’t freak out here. But also don’t touch ANYTHING that you are not familiar with. Find something called the “IP Deny Manager” under the security section and click it one time.

From here, you can simply add the IP addresses that you want blocked as shown below:
blocked ip

Note: I recommend only blocking SINGLE IP addresses, as opposed to a range. Blocking a range can deny many people access to your site, some of whom may not be spammers at all.

Blocking IP addresses is not permanent either. You can unblock them at anytime.

Annnnnnnd that’s it! Easy peasy! Another reason why having a WordPress blog is awesome! Blocking trolls!

Filed Under: Blog, Tutorials Tagged With: tutorial

How to See Stats from a Single Post With Google Analytics

9 Comments

how to see stats from a single post in analytics


Ever wonder how one post is doing on your blog? Want to know how many people visited your post last week, or last month? Well you’re in the right place!

Follow the tutorial below anytime you need to see the stats of a single post or page on your blog. Remember, this will show you the stats for a SINGLE page, in single page view. If your homepage or /page2, /page3, etc pages show full posts, people could be seeing the entire post and it won’t count as a pageview for that single page.

Some sponsors and advertisers want reports on how well the sponsored posts did, so knowing howto pull that information is important. It is also important to know that the single page stats might not accurately reflect how many eyes actually saw that post. If you are concerned about lower pageviews for sponsored posts, consider only showing a part of the post on your homepage with a link to the full post.


So here it goes:


First, select a date range.
date range

Next, take a look at the menu that runs down left side of the page.
how to see single post stats
That will cause another menu to drop down. Click “site content” which will drop yet another menu. From there, click “all pages”. See below:
single post stats
Ok, we’re almost where we need to be! From here, you can either browse through the posts that you see, or use the search box to find your post/page quicker.
stats for a single page
And there you have it! Once you find your post and click on it, you’ll see pageview information for that post. To see a ton of other details about that post, click the “secondary dimension” box and explore there:
post info
Explore on your own in the secondary dimension section, because that is another post, or series of posts, in and of itself!

Filed Under: Tutorials Tagged With: google analytics, traffic, tutorial

Disclosure Policy

As of December 2009, the FTC requires all Blogs generating any source of income to have an official … Read More

  • Bloglovin
  • Facebook
  • Instagram
  • Twitter
  • YouTube
---> Registry Must Haves
---> How to Start a Lifestyle Blog
---> What's in My Hospital Bag

How to Start a WordPress Blog

There are many reasons why you might want to know how to start a blog. Maybe you have a business and want to supplement your online activity with a blog. Good idea! Maybe you want to start an online diary of your life. That's fun too! Maybe you want to start a fashion blog, or a … Read More