How to Verify Your Blog on Pinterest

how to verify your blog on pinterest


how to verify your blog on pinterestIs your blog verified on Pinterest? Do you know how to verify your blog on Pinterest? If it is already verified, you’ll see that glorious check mark as shown above. Verifying your site on Pinterest is easy!

Here’s how to do it:

Head to your profile and click the pencil icon on the bottom right side of your profile info. This will bring up your edit profile screen. At the bottom, you’ll see your website. There will be a box next to your website that says “verify your website”. Click that and you’ll be on your way.

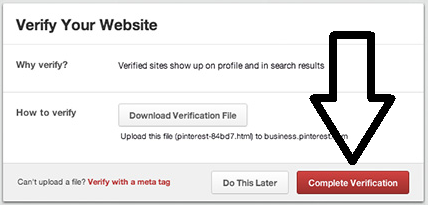
Don’t try to do it the easy way. Click the alternative method as shown below:
verify website with pinterest
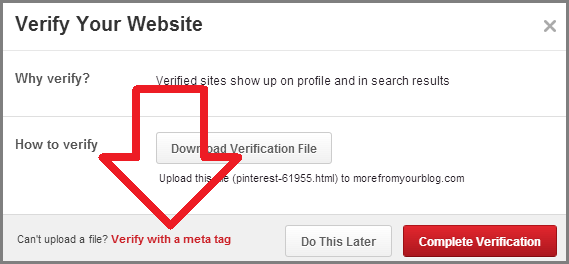
Verifying with a meta tag is the easiest way to verify your blog on Pinterest. When you click the red text that the arrow above is pointing to, you’ll be given a piece of HTML code that looks like this:

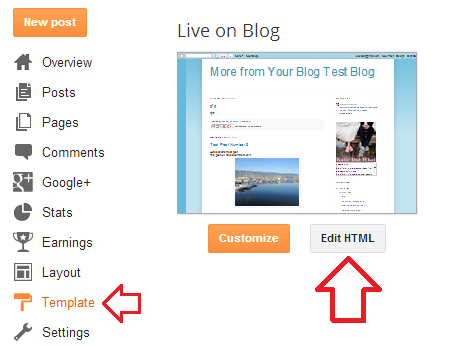
So take that code, copy it and leave the window open. Then head over to your Blogger dashboard and edit HTML:

WordPress users, since all themes are different, this might be a little more complicated. Most themes have a header file. The easiest way to find it is to do a “find” in your browser and search for /head. Once you come across a file with that, you’re in the right place. If you’re using a Genesis theme, use the Simple Hooks plugin to easily place the code in the right spot.

verify pinterest
Now don’t freak out. You’re going to see a LOT of HTML code at this point. You’re going to want to look for the closing “head” tag as show below:
screenshot
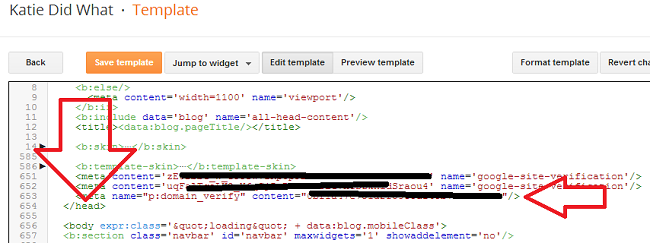
Paste the code just before the closing “head” tag. Then head back to your Pinterest window and click the red “complete verification” button to finish the process.
complete verificationThat should do it! Now go to your profile and look for that magic verified check mark! Now anyone viewing your Pinterest profile can be assured that you are truly the authorized owner of the website listed in your profile.


How to Add Social Media Icons to a Blog

social media icons


First of all, if you’re in WordPress, you have a few plugin options to make the process of adding social media icons to your blog very, very easy. There are numerous plugins including Social Media Widget and Floating Social Media Icon, among others. If you’re using the awesome premium Genesis Framework and theme, I highly recommend Simple Social Icons. WordPress users with Thesis can also use the Simple Social Icons plugin.

So with all of those options for WordPress users, this guide is mainly for Blogger folks.

First, you’re going to have to find some icons that are okay for you to use on your blog.

social media icons

Credit goes to Elegant Themes for this iconic photo.

Just because you found a nice set of social icons doesn’t mean you can use them. They have to be offered up for public use for you to be able to grab them and use them on your own site. Each of the following sites has 50 social media icon sets for you to use.
• http://www.noupe.com/freebie/50-free-social-media-icon-sets.html
• http://too-much-time.com/2013/01/a-bunch-of-free-social-media-icons.html
• http://social-icons.com/50-free-social-media-icons-mixed-designs/

Make sure to click through and see the rules for usage. Some ask for a link back, some ask for nothing. Make sure you’re doing what you’re supposed to.

So once you have decided which icons you want to use, get them each on individual files on your computer. If you download them, that’ll work. You can also do the screenshot/crop method. Whatever works, just get them onto your computer. Then, upload them to Photobucket or a like service.

Once you have your images uploaded, you’re going to want to attach links to the image codes so that when a person clicks on the social media icons, they take them to the proper place.
Here’s how to get the image link from your Photobucket account after you have uploaded and clicked the “Library” menu option:
photobucket tutorialDo that for each image to get the codes for all of your social media icons.
The HTML code with proper link for each button will look like this:
how to make social iconsCopy and paste the code from the box below for easy use. Just replace with your links where shown!

Create all of those pieces of code in a Word or Notepad document so they’re ready for copying and pasting!

Now you’ve got several sets of HTML code, each one is a piece of code that will display a social media icon that links to that site when clicked. Now what?
Well, here’s the good news: you’ve already done the hardest part! Now all you have to do is head to the layout section of your blog, and add an HTML gadget wherever you want your social icons (typically toward the top of the sidebar) to be.

All you have to do from here is copy and paste the HTML code pieces that you created earlier. Don’t press enter when pasting if you want the on the same line. If you only have a few icons, they should all fit on one line. There is a bit of trial and error here if they don’t fit the way you want them. You’ll have to re-size each icon (I use Paint) and try again. You’ll get it though, and it’ll be worth it! If you’d like to center the icons, add a center tags like this:

ALL OF THE CODE

A couple of notes:
• when re-sizing the icons, you won’t be able to go bigger without compromising quality
• try and choose a set of icons that compliments the look of your site while standing out just a bit
• try and estimate the total size of your icons so you only have to do this once

So there you go! Hopefully this helps make the placement of your social media icons a breeze!

Google+ | Twitter

How to Add a “Pin It” Button to Images on Your Blog

This tutorial is for the “new look” Pinterest. If you have not yet switched over, do that now. You will love it! See There’s a New Pinterest Layout ~ See What Changed here for a breakdown of the changes.

Follow these steps to create and add a “Pin it” button for single images on your blog:

pin it button
Click “About” under the category options on the left side of the main page.
——————————————————————————————————————————————–
How to Add a
Click “Goodies” from the menu at the top of the page. At this point, you can bookmark the “Goodies” page for quick access anytime you want to make one of these buttons.
——————————————————————————————————————————————–

Scroll down until you see the Pinterest Widgets and click “Make Pin It Button” to get started.
——————————————————————————————————————————————–
Now you’ll be at this screen. Follow the text in red to see what you’re supposed to do here:
pinterest button tut
image url
When you click “Build it”, you’ll be able to see what the button will look like. At this time, you can figure out if you like the counter to be above, or beside the pin button.
——————————————————————————————————————————————–
Ok, now we have the code for the button just below the “Build It” button that we clicked.
Follow the instructions in red to see how to place that code into your blog editor. Make sure you are placing the code when in the HTML editor of your post, not the “compose” editor.
how to create a pin it button
——————————————————————————————————————————————–
That’s it! The Pin it button should be on your site below your picture! Now, if people want to , they can Pin an image right from your site, which is a VERY good thing!

How to See What’s Getting Pinned from Your Site

My lovely wife’s site search.


Pinterest is a huge traffic driver. Giving people the ability to pin at least one image from a post on your site gives you the opportunity to gain more traffic. Once someone pins something, all of their followers on Pinterest can see it. And if they pin something, all of their followers can see it. And… well that’s how virality happens! But don’t you ever wonder what’s getting pinned from your site? Sure, you can look at every individual image, but what if you could see them all with one simple search? Well, lucky for you, there’s an easy way to see all of the pins that come from images on your site.

Type this into your web browser:
http://pinterest.com/source/YOURSITE.COM/
(leave out the http and the www)

The result will be all images from your blog that others have pinned with pin counts if applicable. Now you can see which types of images are the most popular when it comes to Pinterest. That information can be very valuable. If a certain depth of field is more popular, or a certain background, it’s good to know. Take a look at your most pinned images and react accordingly. If you just look to look, you’re not really gaining anything from it. It’s all about how you respond to your new-found information!

Note: you can actually search for what is getting pinned from anyone’s site. Just type their url instead of yours in the search. This is a great idea for the more popular sites. You can take a look and see what types of photos are getting the most pins and act accordingly. (Of course, without copying. Nobody likes a copycat.)

To see a detailed guide to the “New Look” of Pinterest, see:
There’s a New Pinterest Layout ~ See What’s Changed

Have a productive day! :)