
 Is your blog verified on Pinterest? Do you know how to verify your blog on Pinterest? If it is already verified, you’ll see that glorious check mark as shown above. Verifying your site on Pinterest is easy!
Here’s how to do it:
Head to your profile and click the pencil icon on the bottom right side of your profile info. This will bring up your edit profile screen. At the bottom, you’ll see your website. There will be a box next to your website that says “verify your website”. Click that and you’ll be on your way.
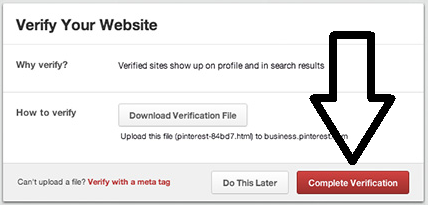
Don’t try to do it the easy way. Click the alternative method as shown below:
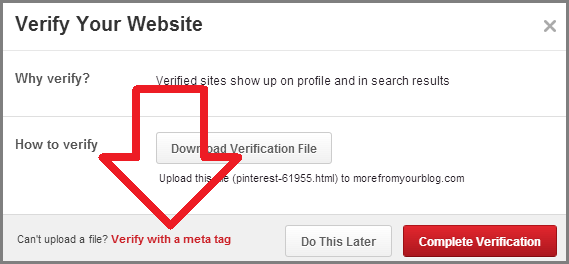 Verifying with a meta tag is the easiest way to verify your blog on Pinterest. When you click the red text that the arrow above is pointing to, you’ll be given a piece of HTML code that looks like this:
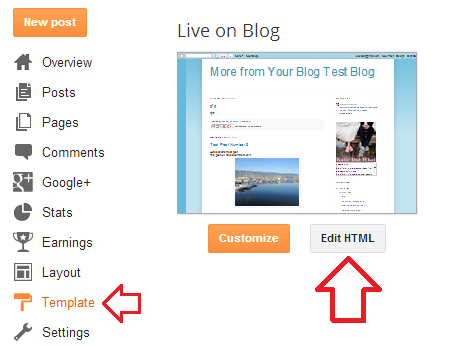
So take that code, copy it and leave the window open. Then head over to your Blogger dashboard and edit HTML:
WordPress users, since all themes are different, this might be a little more complicated. Most themes have a header file. The easiest way to find it is to do a “find” in your browser and search for /head. Once you come across a file with that, you’re in the right place. If you’re using a Genesis theme, use the Simple Hooks plugin to easily place the code in the right spot.
Now don’t freak out. You’re going to see a LOT of HTML code at this point. You’re going to want to look for the closing “head” tag as show below:
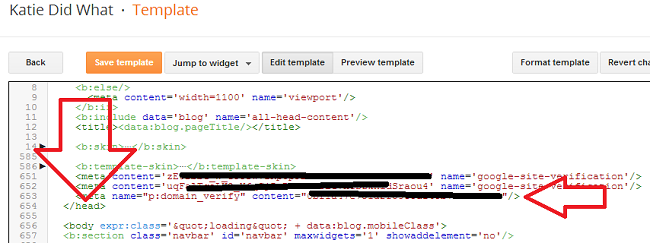 Paste the code just before the closing “head” tag. Then head back to your Pinterest window and click the red “complete verification” button to finish the process.
 That should do it! Now go to your profile and look for that magic verified check mark! Now anyone viewing your Pinterest profile can be assured that you are truly the authorized owner of the website listed in your profile.


Thank you for this, Zack!
I had tried to do this in the past, and failed.
I love all of your blogging advice!
floral&fudge
No problem! Glad it helped!
Thanks so much for this! It really helped me!!! Im gunna be following your blog now via email, bloglovin’ twitter, facebook & pinterest!
Here’s mine if you wanna follow back – http://todayscommoncents.blogspot.com
Sweet! Glad it helped! 😀
Dear Zack:
My name is Angely Martinez and I am also a blogger. I came upon your post about how to verify your blog on Pinterest. Although I tried the instructions from your post, it does not seem to be working for me. What else would you advice me to do?
Thanks,
Angely
Hmm, I’m not sure why it wouldn’t work. Can you provide some more details? Did it allow you to go through the whole process and the check-mark simply didn’t appear?
I tried it again yesterday and it worked! Thanks!
Yay good to hear!
well hell, you were a good find today. thanks!
Ha! Glad to be here!
Awesome! Thanks a lot for the tutorial!
No problem! Thanks for stopping by! 🙂
hi there,
I can’t find my tag!! why would it be missing?
Do you see the “verify with meta tag” text as shown in the picture in the post?
I’m stuck! I’ve tried several things and I still get this message: Error parsing XML, line 638, column 4: The value of attribute “content” associated with an element type “meta” must not contain the ‘<' character.
Can you help?
Thanks,
Cindy @ Crazylou
I can take a look at the code that you are trying to paste. Get the code from Pinterest and shoot me an email (don’t want the code here in public) so I can take a look at it.
Thank you so much for your help Zack!! What you sent worked perfectly! I can’t wait to see the analytics from Pinterest!!
Awesome! Glad we got it worked out!
I followed your instructions and it removed all of my pictures from my blog. Any idea how I can get them back?
Oh no! No idea why that would happen. The first thing I would do is remove the code that you placed. Hopefully that gets your images back. Before you do that, you can take a screenshot of the code and where it is placed and email it to me. I’ll try and see if I notice anything.
Thanks Zack, I did it !!! I cannot believe I actually managed to do that! 🙂 Have a great Sunday evening!
Worked for me Zack!! Thanks for the easy to follow tutorial!! 🙂
Yay! No prob, glad it worked!