Image property of ZR Media Group LLC
The following is a guest pots by Ryan from BizShark.com. Ryan is here to talk to you about one of the most important social networks around: Twitter. This is really good stuff here guys, so check it out.
If you blog regularly, you know the importance of social media. Twitter, in particular, is one of the most useful publicity tools for bloggers to take advantage of but so many writers don’t know where to start!
Here are a few (easy) ways you can tap into the power of Twitter to boost your blog.
Set Up a “Blog Specific” Account
So you’re already using Twitter in your personal life? Great! That’s going to make it even easier to get up to speed. What you don’t want to do, however, is use your personal Twitter account to promote your blog – it’s best to set up a separate handle just for blogging purposes. In the rare case that your personal identity is your blog identity you can stick with one account, but if you have a food blog, a fashion blog, or even a business blog, you should have a dedicated Twitter account.
Build a Readership
Don’t think it’s as simple as setting up an account and Tweeting links to your blog. It doesn’t work like that! Before you self-promote you’ve got to build a loyal audience who cares what you have to say. The easiest ways to do this are to be consistent in your Tweets, regularly Tweet useful information (think: relevant articles, reTweets, and insights), and to engage with your readers often. Twitter is made for conversation.
Tie Your Blog and Twitter Account Together
There are a few simple, SEO-friendly things you can do to link your Twitter account and blog together that you shouldn’t pass up. For one, add a Twitter widget to your blog – in both the sidebar and at the bottom of every post. This makes for easy Tweeting for your blog readers which is always a good thing. Second, automatically set your blog to Tweet when a new post goes up (this is simple on WordPress and Blogger platforms.) This will ensure you never forget to promote when you’ve got new content.
Promote Your Blog
NOW you’ve reached the crucial stage when you can use Twitter to promote! Don’t oversaturate your posts touting your own blog, but do feel free to Tweet links to your content as it goes up (and one or two repeat-Tweets aren’t a bad idea either.) Do your best to use keywords and hashtags in the Tweets that will attract the type of readers you’re looking for, and make sure a least some of your blog content is “shareworthy” – i.e. listicles, cool graphics, or interesting slideshows.
Reach Out to Other Tweeters
Twitter is like a massive networking event for bloggers and industry thinkers. Once you’ve established yourself, feel free to use this casual medium to reach out to other content creators. Tweet at industry pros directly and try your best to strike up conversations with bloggers you admire. The absolute best way to utilize Twitter as a blogger is to deepen your relationships and solidify a readership with people outside the blogosphere.
Twitter is all about consistency, so don’t neglect your Tweeting duties. Keeping people interested means thoughtful, regular contributions so make Tweeting a scheduled part of your blog routine. The more you Tweet the more likely you are to hit on something people are interested in…and since your Twitter account is tied to your blog, you’ll have more page views in no time!
Ryan is a product manager at BizShark.com, with 5 years experience in online marketing and product development. In addition to web related businesses, he also enjoys the latest news and information on emerging technologies and open source projects.


 Simply enter the new name and click “save changes” and you’re done! The name of the page will be immediately changed to the new name.
 Notice there is no box to change your name. That lovely option has been replaces with some text that says “request name change” that you’ll have to click. When you click it, you’ll be brought to this page:
 Read the rules and click the box to open up some more options:
 Here, you’ll want to choose what your page represents. Most likely if you’re reading this, you will be choosing the “website or blog” option. Choosing that option will bring up some more rules:
 When you click the box here, some more options will drop down including a box with your current page name and a box to enter your new (requested) page name. You will also be give a few reasons to choose from as to why you are submitting this request to change your name. Rebranding is one of the choices.
 Now here’s the tricky part. Facebook wants you to upload some sort of documentation that shows your REQUESTED business name. This has to be something like a bill, your business licence or tax info. If during your rebrand, you changed your business name with your local organization or you file taxes under the new name, that would be the easiest way to do this. Upload any tax form (with social security/income blurred) with your new name on it.


 Is your blog verified on Pinterest? Do you know how to verify your blog on Pinterest? If it is already verified, you’ll see that glorious check mark as shown above. Verifying your site on Pinterest is easy!
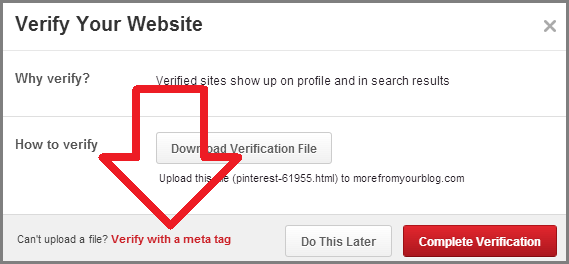 Verifying with a meta tag is the easiest way to verify your blog on Pinterest. When you click the red text that the arrow above is pointing to, you’ll be given a piece of HTML code that looks like this:
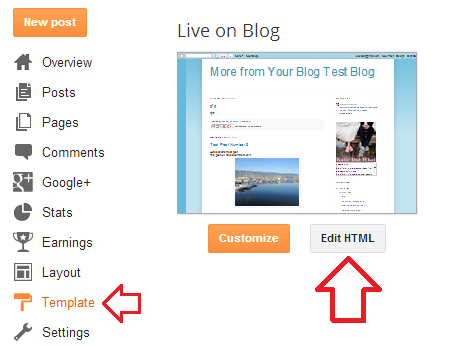
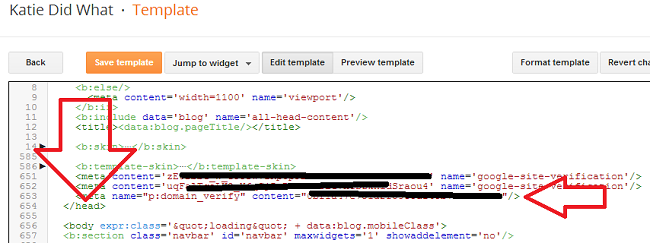 Paste the code just before the closing “head” tag. Then head back to your Pinterest window and click the red “complete verification” button to finish the process.
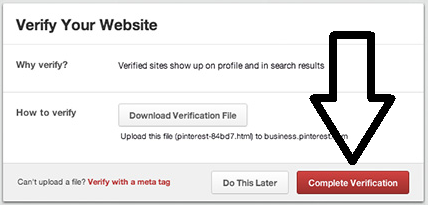 That should do it! Now go to your profile and look for that magic verified check mark! Now anyone viewing your Pinterest profile can be assured that you are truly the authorized owner of the website listed in your profile.
 Do that for each image to get the codes for all of your social media icons.