I blogged for more than a year before being enlightened by Aweber. I’m a cheap guy, so it was their $1 one-month trial that got me. It took about 48 hours for me to realize that I wasn’t going anywhere even after my $1 month was up.
Transferring was a breeze with quick importing from a variety of file types (XLS, XLSX, TSV, CVS, TXT) and once that was done, it was time to create my auto-responder series. (An auto-responder series is a series of pre-determined emails that subscribers get on a schedule that you set) Again, this was all so easy and user-friendly. When it’s time to create an email, you are brought to an easy-to-use screen with dozens of pre-designed templates. You can also opt to customize it yourself. 
You can add your own logo with ease. They also have the ability to easily add social media follow buttons and even promote a product using coupons. 
That is just one example of how Aweber makes things very easy on you.
Once you create your first auto-responder message, you simple save it and say when you want it to go out. I generally space each message out 7-10 days. You literally tell Aweber, “send this one 7 days after the last one” and it does it automatically. I have approximately 20 emails in my auto-repsonder series. That means a new subscriber will get a weekly or bi-weekly email for at least 6 months from me. In between those, I can choose to sprinkle in some other emails promoting specific blog posts, eBooks or whatever.
Having an auto-responder series is a key part of building your blog as a business, especially if you plan on selling products.
—————————————————————————————————————————————————————–
You can also use Aweber to automatically send full or partial blog broadcasts. This is a more classic “email update newsletter” that keeps subscribers apprised on your blog’s activity. There are a variety of pre-made templates here as well. You can also create your own, but you’ll need to be comfortable with their coding system.
You can set the blog broadcasts to go out on a certain day of the week and at a certain time. The broadcast can be set to go out once per week, or when you blog reaches a certain number of updates. So if you set this to one, the broadcast will go out each day that you have a new post.
—————————————————————————————————————————————————————–
Aweber’s sign-up form creation tool is unbelievably easy to use and can save you a ton of time and money. I used to pay to have nice-looking email signup boxes created, but now I just use Aweber’s awesome tool and I’m good to go! 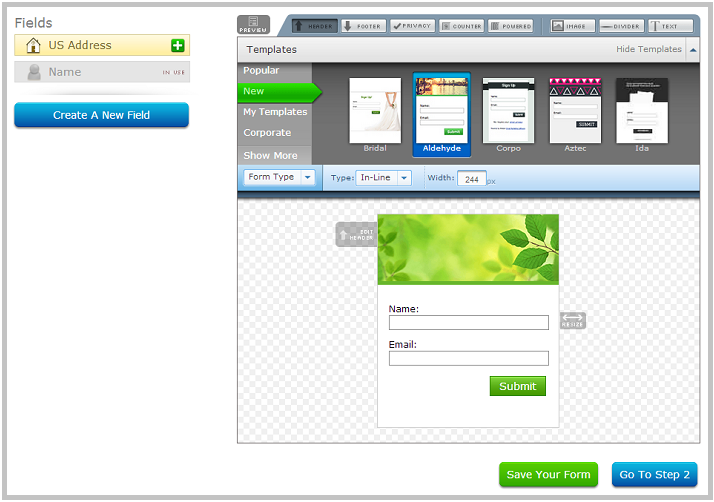
—————————————————————————————————————————————————————–
One of the absolute best things about Aweber is the amount of information they give you about your subscribers. You can see which form they used to subscribe and on which page of your site they signed up on. This is essential for A/B testing the placement of your subscription boxes. With this information, I was able to see that people were not really using the subscribe box at the bottom of my posts, so I took it out. I am designing a new box at this time and will test that one in the near future. If I didn’t have that information, I would have just left the non-performing box there.
You can also tell which country your subscribers are in, which could be useful if you are trying to reach a certain audience.
Knowing what is working is very important in maximizing your success and Aweber provides a good amount of data for you to figure out what works.
—————————————————————————————————————————————————————–
Yet another great feature of Aweber is their unsubscribe feature. If Aweber recognizes undeliverable email addressed in your list, they will unsubscribe them, thus saving you from having to pay for them. Since Aweber charges based on how many subscribers you have, this is a very nice service they provide.
You can simply search your email list by “no opens since…” and select a date you want. So say you want to unsubscribe everyone who has not opened your emails in the past 3 months. Simply set the date to 3 months ago hit search, select all and click unsubscribe. Done!
—————————————————————————————————————————————————————–
Another feature of Aweber is list automation. This will automatically subscribe or unsubscribe people to ONE list if they sign up for ANOTHER list. So say you have a standard auto-responder series going and then you release an eBook. If you decide to give away a chapter and promote that eBook on a separate email list, you can set up your Aweber lists so when someone subscribes to your eBook list, they are added to your main list as well.
Be careful with this, as sometimes people don’t like to be auto-added to lists. If the lists are related and not spammy, you should be fine.
—————————————————————————————————————————————————————–
Aweber’s reporting is top-notch.
With a couple of clicks, you can see the numbers for total reach from any or all of your email campaigns. This can be broken down by single date too. With this info, you can see which days of the week most people are reading emails. This is an important piece of information when deciding when to send out email blasts.
Aweber provides detailed stats on subscribers, email opens, clicks and much more. You can also easily see where the majority of your email subscribers are in terms of your follow-up series. If a large percentage are at your last message, it’s time to create a few new ones!
—————————————————————————————————————————————————————–
Basically, if you’re looking to get a kick-ass email service with all of the bells and whistles at a competitive cost, Aweber is the way to go. Check it out by signing up for the $1 one-month trial today! You’ll be glad you did.
For more on email lists, see How to Build an Email List and Use it for Profit.